Sunday 27 December 2015

Testing exceptions with NUnit 3.x

If you are moving from NUnit 2.x to 3.x you will find that the old ExpectedException attribute is missing. Not to worry. There are alternatives.

Here’s an example. In Domain-Driven Design (DDD) there's a concept of an 'entity'; an object with an identifier. I have been experienting with a supporting framework for DDD which includes a base class for entities. I decided I didn’t want entities to be instantiated without an identifier and I didn’t want that identifier to be the default value for the identity type. Here’s a simple entity class together with a fragment of the base class:

private class Customer : Entity<int>
{
    public Customer(int id) : base(id)
    { 
    }
}

public abstract class Entity<T> : IEquatable<Entity<T>>
{
    protected Entity(T id)
    {
        if (object.Equals(id, default(T)))
        {
            throw new ArgumentException("The ID cannot be the type's default value.", "id");
        }

        this.Id = id;
    }

    // ... snip ...
}

With 2.x tests you could write something like this:

[Test]
[ExpectedException(typeof(System.ArgumentException))]
public void EntityConstructor_WithDefaultValue_ThrowsException()
{
    var customer1 = new Customer(default(int));
}

If you have tests like that and you update NUnit to 3.x that won’t even compile because the attribute isn’t there anymore. No need to panic though, there are a couple of options available to you. The first is to use Exception Asserts (i.e. the Assert.Throws method).

[Test]
public void EntityConstructor_WithDefaultValue_ThrowsException()
{
    Assert.Throws<ArgumentException>(() => new Customer(default(int)));
}

The second option is to use the Throws Constraint which is my preference.

/// 
/// Tests that the ID can't be the types default value.
/// 
[Test]
public void EntityConstructor_WithDefaultValue_ThrowsException()
{
    Assert.That(() => new Customer(default(int)), Throws.ArgumentException);
}

Actually the last 2 alternatives have a subtle improvement over the ExpectedException attribute.

The attribute approach doesn’t allow you specify exactly when and where the exception is expected to be thrown. If you have a test with multiple lines of setup code any one of those lines could throw an exception which would be caught by the attribute (assuming the exception type is correct) so you might not be testing what you think you are testing.

The assertion approach allows you to specify the exact line of code you expect to throw the exception.

Saturday 26 December 2015

Bitdefender and the hard sell

Update 03/01/2016 – My issue was resolved by BitDefender (see details at the end of the post).

OK, so I’ve been using Bitdefender again. I should know better I guess after the trouble I had in the past (e.g. Are BitDefender (Avangate/Digital River) behaving like confidence tricksters?, BitDefender and underhanded automatic re-subscription, and more besides).

Now they have taken to spamming me every single day and often more than once a day with this little gem that pops up on my desktop.

image 

There is no way of stopping this pop-up as far as I can see. I have 115 days left on my subscription so am I to expect this to appear every single day until I renew?

Bitdefender, thanks for the offer but now let me decline and stop this goddam thing from hogging my desktop. I will renew when I want to renew which will be at the end of the current license period. At that time you will make an offer of how much it will cost me and I will make my own mind up whether it’s acceptable or not. If not, I will take my business elsewhere.

Make the pop-ups go away!

Update 03/02/106

BitDefender gave me the following instructions via Twitter:

  1. Open Bitdefender
  2. Click on the human-shaped button, in the upper right corner
  3. Click on Settings (General Settings)
  4. Remove the check-mark next to "Display special offers and product notifications".


Now I checked the settings before and really can’t remember seeing this option (obviously). Anyway, hopefully this will make the ads go away. I’ll keep you posted if it doesn’t.

Monday 21 December 2015

Building a .Net 4.6.1 project with Jenkins

This post covers the basic steps I took to get a .Net 4.6.1 project written with Visual Studio 2015 and C#6 to build with Jenkins. At the time of writing Jenkins in at version 1.642. I include instructions for getting NUnit 3.0 tests to run and to output an XML test report. The project I was working on also used NuGet version 3.3.0.

Step 1 – Prepare the build server with .Net 4.6.1

You may need to install the following packages on the build server so Jenkins can build .Net 4.6.1 projects.

Step 2 – Add MSBuild v14.0 to Jenkins

Go to Manage Jenkins > Configure System. Find the MSBuild section and click MSBuild installations… Click Add MSBuild and enter the new MSBuild details for version 14.0:

SNAGHTML10c02a8_thumb[2]

Save the configuration.

Step 3 – Create the Jenkins job

Start by creating your Jenkins build in the usual way. Setup your basic project data, source code management and build triggers as usual.

NuGet package restore

The next step is to get NuGet package restore working. NuGet package restore has changed since version 2.x and the easiest way I have found to get it to work with a basic Jenkins build is to use the command-line package restore option. This involved downloading the latest NuGet command line distribution and putting it a known location on the server.

Add a build step to Execute Windows batch command.

SNAGHTML112ee14_thumb[2]

Edit the command to call the NuGet executable with the restore command line argument. I installed the NuGet executable to C:\Tools\NuGet.

SNAGHTML11564f0_thumb[2]

Add MSBuild step

Next add the new MSBuild step using version 14.0 of MSBuild.

SNAGHTML117809c_thumb[2]

SNAGHTML1187a9c_thumb[3]

Alternative – use a batch command to call MSBuild

If you don’t want to add a new MSBuild version to Jenkins you can call MSBuild directly. When it comes to adding the MSBuild step don’t choose “Build a Visual Studio project or solution using MSBuild” but use “Execute Windows batch command” instead.

SNAGHTMLfcb8f5_thumb[2]

Enter the command to call MSBuild directly:

"C:\Program Files (x86)\MSBuild\14.0\Bin\MsBuild.exe" Andy.French.Fat.Calculation.sln

Add a step to run NUnit

Before adding this step I had to download and install the latest version of NUnit (version 3.0.1) because that’s what I’d used in the project as a NuGet package to write my unit tests.

SNAGHTML11ca60e_thumb[3]

Note that the command line options for the executable have changed in version 3.x. I had to add a new –result option specifying an output file name. I also specified NUnit version 2 output format to make the data suitable for use with the existing test result plugins.

Don’t forget to add a post build action to publish your test results using the same file name as mentioned in the previous batch command.

SNAGHTML125784b_thumb[3]

Save your changes and you should be good to go. Phew!

Monday 21 December 2015

Thursday 10 December 2015

How to upgrade TeamCity

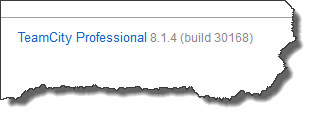
I’m assuming you have already installed JetBrains TeamCity and you are looking to upgrade an existing installation. You can check what version of TeamCity you are running by looking in the footer of the web interface.

SNAGHTMLa7376f

At the time of writing TeamCity is in version 9.1.4.

So, assuming you don’t have the latest version and need to upgrade let’s press on. Grab the installer from the JetBrains site and follow the steps below.

Step 1 – Backup TeamCity

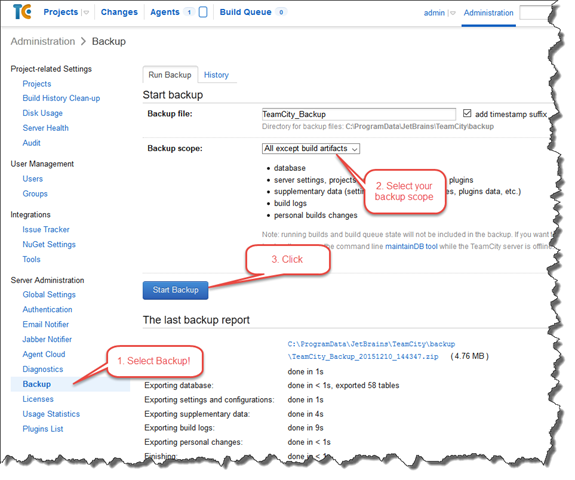
Make sure that TeamCity is running and access the web user interface. Under Administration – which can be found top-right - choose Backup from the Server Administration section – bottom-left. Select an appropriate Backup scope and click Start Backup.

SNAGHTML9b5d7f

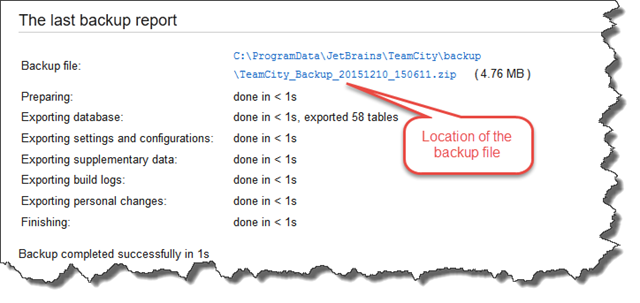
Wait patiently until your backup completes. You can see where TeamCity has put the backup file in the report section at the bottom of the page.

SNAGHTML9eb67e

Step 2 – Install the latest version of TeamCity

Double-click on the installer and follow the wizard.

image

Follow the wizard through. It is very likely you’ll be prompted to uninstall the previous version of TeamCity. I always do so.

image

Uninstall the previous version.

image

Hopefully the previous version will have been uninstalled.

image 

Now we can start installing the new version.

image

Keep running through the wizard. Eventually you’ll be asked to allocate an account to the TeamCity server and the build agent. I always use the system account for each.

image

image

Keep ploughing through the wizard until you hit the final step.

image

Check the “Open TeamCity Web UI after Setup is completed” checkbox and click Finish. The web UI should open for you.

Step 3 – Data upgrade

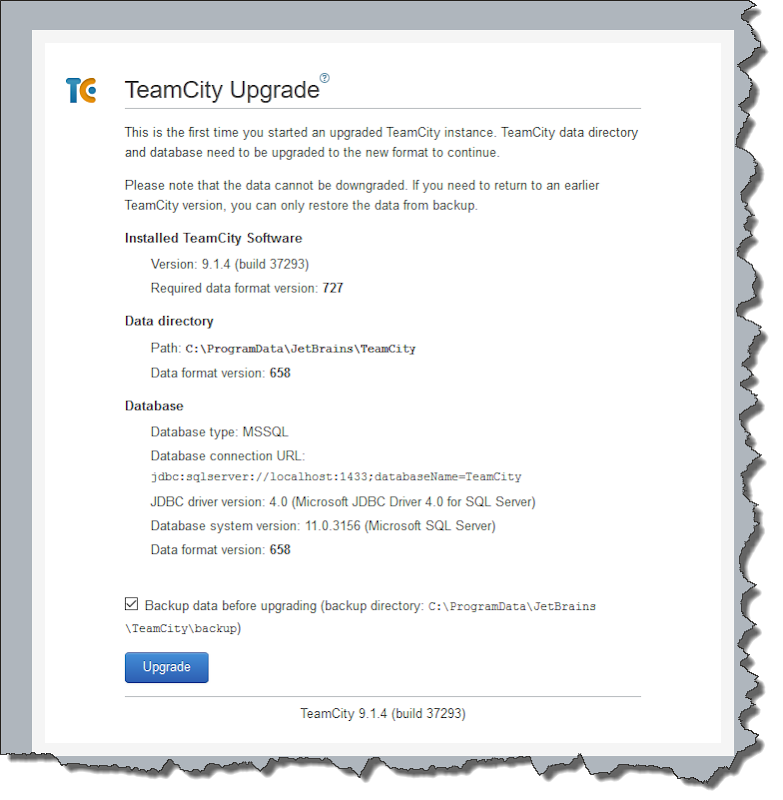
It is quite possible that when you view the TeamCity web UI you’ll be notified that data upgrade is required.

SNAGHTMLd86cf7

Assuming you are an administrator, click the “I’m a server administrator, show me the details” link. On the page that follows you’ll be prompted for a token that’s in the TeamCity server log. On my system – and I use default TeamCity settings – that’s found in C:\TeamCity\logs and is called teamcity-server.log.

SNAGHTMLdbedb2

Copy the token and paste it into the first on the form before clicking Confirm.

SNAGHTMLd93fc8

On the next form click Upgrade and cross your fingers.

SNAGHTMLdcec46

Hopefully TeamCity will now start.

SNAGHTMLde0910

Once it has started you should be dropped back in the management UI.

SNAGHTMLdf445f

Job done. Congratulate yourself on how awesome you are.

What if it all went wrong?

If you are unlucky enough for there to have been a problem you might have to restore TeamCity from the backup you took at the start of the process.

Tuesday 8 December 2015

Saving an SSH key when using Git

Note to self: Here’s a quick reminder about how to save an SSH key for use with Git command line operations. You should have your private key file already. Following this procedure makes the OpenSSH key file available to Git command line operations against a repository that requires authentication.

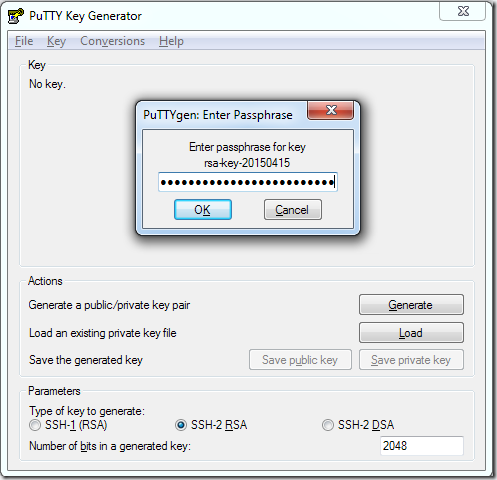
Step 1 - Open PuTTygen and load your private key file. Enter your pass phrase when prompted.

2015-12-08 10_25_54-PuTTY Key Generator

Step 2 – Export the OpenSSH key using the Conversions > Export OpenSSH key menu item.

Greenshot2

Step 3 – Save the file to the .ssh folder in your user home directory. Name the file id_rsa.

Greenshot3

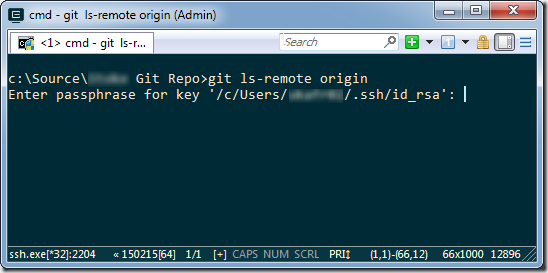
Step 4 – When you use a Git command line operation that requires authentication expect to be prompted for the pass phrase.

Greenshot4

Sunday 6 December 2015

The Inside Of My Head–No.8

I do enjoy a good doodle and I thought I’d show you my latest effort. My doodles can take weeks or even months to complete and they are typically done in the notebook I use for work.

Here’s a picture of the notebook with the original full page doodle.

IMG_0006c-book

And here’s a scan of the page before any additional processing.

IMG_0006c-gs-sm

What I like to do is to use some basic image processing to add a splash of colour. Nothing too fancy - they are only doodles after all - but adding some layers to the image using an appropriate blend mode can have quite an effect.

Here I have added a series of layers using a burn blend mode with a different colour in each layer. By changing the amount of blend mode the subtlety of the effect can be varied.

IMG_0006c-sm

There’s plenty more where that came from!